The SWAP test and loading pytket circuits
Download this notebook - swap_test.ipynb
In this example we will use the SWAP test to demonstrate the construction of a simple Guppy program and show how pytket circuits with multiple registers can be loaded as Guppy functions.
from guppylang import guppy
from guppylang.std.quantum import qubit, h, cx, toffoli, measure, discard_array
from guppylang.emulator import EmulatorResult
from guppylang.std.builtins import result, array


from pytket import Circuit
from pytket.circuit import StatePreparationBox
from pytket.passes import DecomposeBoxes

import numpy as np
Background
The swap test is a simple quantum circuit that allows us to approximate the squared overlap between two quantum states.
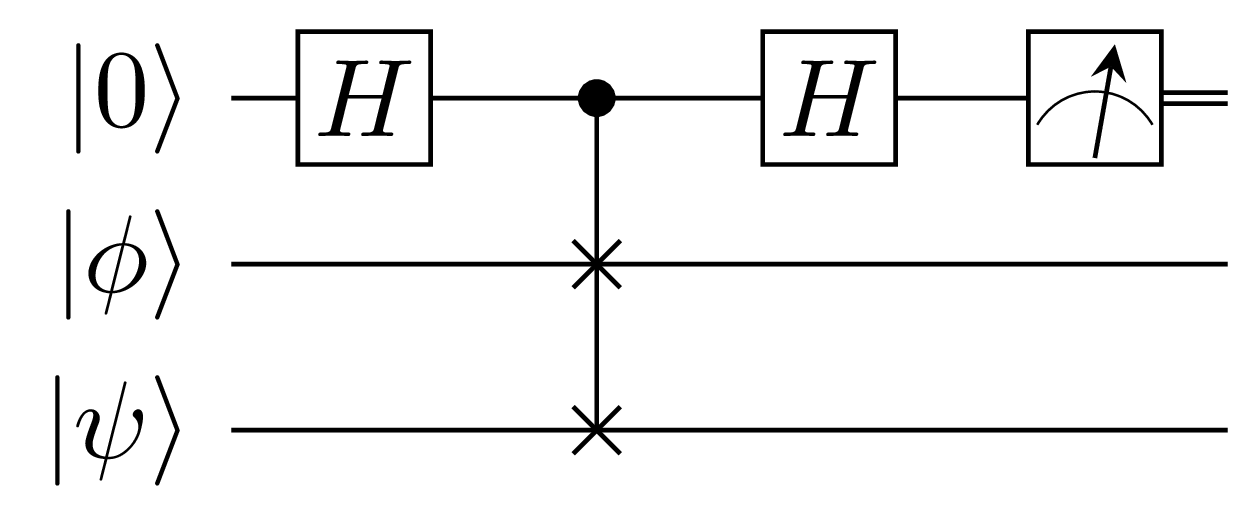
We apply controlled swap operation to swap the qubits in the \(|\psi\rangle\) and \(|\phi\rangle\) registers. This swaps the two target qubits if the control qubit is in the \(|1\rangle\) state and acts as the identity otherwise.
Notice how only the first qubit is measured, giving \(|0\rangle\) or \(|1\rangle\). The value of our squared inner product is related to the probability of measuring \(|0\rangle\) and \(|1\rangle\) as follows.
To approximate \(|\langle\psi|\phi\rangle|^2\) within an error \(\epsilon\) we will need to run the program for \(\mathcal{O}(\frac{1}{\epsilon^2})\) shots. For more background on the swap test, see this Wikipedia article.
In this example we will consider the following three qubit states
Controlled SWAP
Firstly lets define a Guppy function to implement our CSWAP gate in terms of Toffoli and CX gates.
@guppy
def cswap(control: qubit, q1: qubit, q2: qubit) -> None:
    cx(q1, q2)
    toffoli(control, q2, q1)
    cx(q1, q2)
As we are doing the swap test for two states with three qubits each, we will need to use three CSWAP gates to swap all of the qubits in both state preparation registers.
@guppy
def cswap_layer(ancilla: qubit, arr0: array[qubit, 3], arr1: array[qubit, 3]) -> None:
    for i in range(3):
        cswap(ancilla, arr0[i], arr1[i])
State Preparation using pytket
Now for the state preparation phase. Here we will leverage the StatePreparationBox construct from pytket.
We will create a pytket Circuit with three registers. One qubit is used for the ancilla, and three qubits each for the two state preparation registers.
# Define two StatePreparationBox(es) by passing the amplitudes for |S> and |W> as numpy arrays
w_state = 1 / np.sqrt(3) * np.array([0, 1, 1, 0, 1, 0, 0, 0])
s_state = 1 / np.sqrt(7) * np.array([0] + [1] * 7)

w_state_box = StatePreparationBox(w_state)
s_state_box = StatePreparationBox(s_state)


# Build a pytket Circuit with 7 qubits
pytket_circ = Circuit()
ancilla = pytket_circ.add_q_register("a", 1)
w_qubits = pytket_circ.add_q_register("w", 3)
s_qubits = pytket_circ.add_q_register("s", 3)


# Append the state preparation subroutines to the empty circuit
pytket_circ.add_gate(w_state_box, list(w_qubits))
pytket_circ.add_gate(s_state_box, list(s_qubits))
[StatePreparationBox s[0], s[1], s[2]; StatePreparationBox w[0], w[1], w[2]; ]
Before loading the state preparation circuit into Guppy, we can use the DecomposeBoxes pass to decompose the pytket circuit into CX and Ry gates.
DecomposeBoxes().apply(pytket_circ)
True
We can now load in the pytket circuit and create a corresponding Guppy function which takes the ancilla, \(|S\rangle\) and \(|W\rangle\) registers as inputs.
pytket_state_prep = guppy.load_pytket("pytket_state_prep", pytket_circ)
Here, the separate quantum registers in the circuit are treated as distinct Guppy arrays. The loaded circuit can now be invoked as a pytket_state_prep Guppy function which takes three arrays (corresponding to "a" "s" and "w") as input. Note that as with pytket the qubit ordering here is lexicographic. So the arrays are arranged in alphabetical order with "a" first followed by "s" and finally "w".
The load_pytket function has a use_arrays flag which is set to True by default. Setting this argument to False means that Guppy will not create arrays for the distinct registers but instead will treat each named qubit as a separate function argument to pytket_state_prep. In this case we would have seven distinct qubit arguments to pytket_state_prep instead of three arrays.
Execution on Selene
Now we can compose the different parts of our program together into a main function. Here we only need to measure the first qubit so we discard the two state preparation registers.
@guppy
def main() -> None:
    w_qubits = array(qubit() for _ in range(3))
    s_qubits = array(qubit() for _ in range(3))
    ancilla_reg = array(qubit())
    # The pytket function only acts on arrays
    pytket_state_prep(ancilla_reg, s_qubits, w_qubits)

    (ancilla,) = ancilla_reg

    h(ancilla)
    cswap_layer(ancilla, w_qubits, s_qubits)
    h(ancilla)

    result("c", measure(ancilla))

    # We are only interested in measuring the first qubit
    # Discard all the of |W> and |S> qubits to avoid linearity violation.
    discard_array(w_qubits)
    discard_array(s_qubits)
We can now compile and execute our program on Selene.
my_shots = main.emulator(n_qubits=7).with_seed(91919).with_shots(2000).run()
Now let’s look at the frequencies of the \(|0\rangle\) and \(|1\rangle\) measurement outcomes.
print(my_shots.register_counts()["c"])
Counter({'0': 1414, '1': 586})
Conclusion
Finally, lets get an estimate for the value of \(|\langle W| S \rangle|^2\) by rearranging our expression for \(P_0\)
def eval_squared_overlap(shots: EmulatorResult) -> float:
    counter = shots.register_counts()["c"]
    p0 = counter["0"] / (counter["0"] + counter["1"])
    return 2 * p0 - 1
eval_squared_overlap(my_shots)
0.4139999999999999
Now lets compare with the classical calculation. We can just compute the inner product between the \(|S\rangle\) and \(|W\rangle\) statevectors with numpy.
print(abs(np.vdot(w_state, s_state)) ** 2)
0.42857142857142866