Getting Started
Installation
Guppy is installed as the guppylang Python package from PyPi.
pip install guppylang
uv add guppylang
Guppy can be used with Python versions 3.10-14. The macOS, Linux and Windows operating systems are supported.
The source code for Guppy can be found in a public repository on GitHub. If you have a feature request or think you have found a bug, feel free to raise a GitHub issue.
Guppy programs can be executed on the Selene emulator. As of the v0.21 release, Selene is now included with guppylang and powers the guppylang.emulator module under the hood.
Example: A simple circuit
Let’s write a Guppy program to implement this circuit, which involves some classical control based on measurement outcomes:
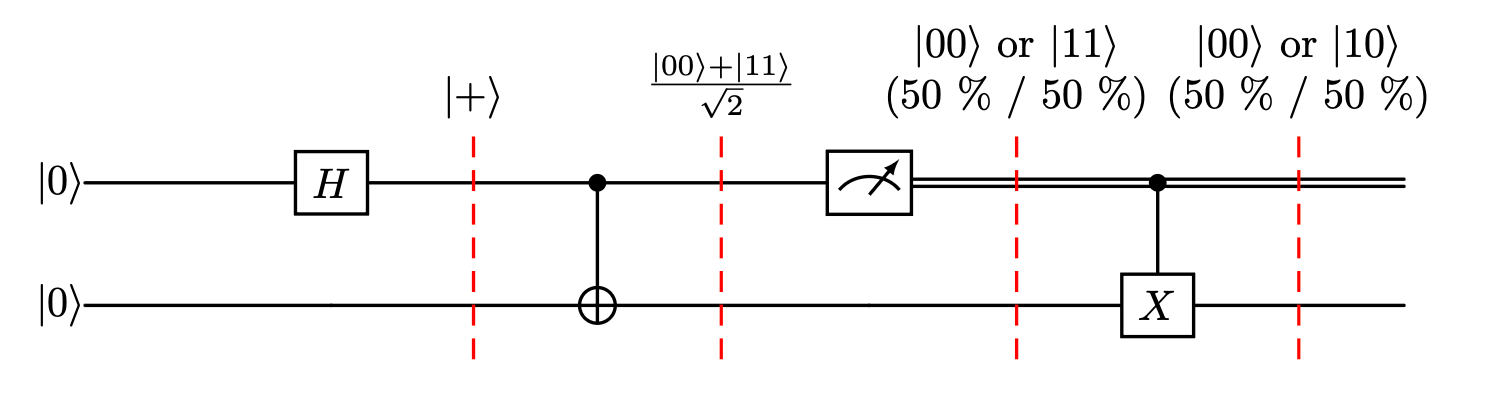
The intermediate state of the qubits as the circuit progresses is annotated above the dashed lines. Using Guppy, these resulting states and measurement outcomes can be numerically calculated using an emulator.
To implement this circuit in Guppy, we define a Python function with the @guppy decorator.
Since our circuit takes no input, the function does not have to have any parameters.
Similarly, as the circuit prepares a single-qubit state, we must annotate the function with this as the corresponding return type.
We can also record the outcome of the mid-circuit measurement for later evaluation using result, as this will make it available to the user after we run the simulation.
from guppylang import guppy
from guppylang.std.builtins import result
from guppylang.std.quantum import cx, h, measure, qubit, x


@guppy
def simple_circuit() -> qubit:
    q1, q2 = qubit(), qubit()

    h(q1)
    cx(q1, q2)

    outcome = measure(q1)
    result("q1", outcome)

    if outcome:
        x(q2)

    return q2
simple_circuit.check()
We can write a function that invokes this circuit and consumes the produced qubit via a measurement. This outcome is also recorded for later evaluation as well.
@guppy
def evaluate() -> None:
    q = simple_circuit()
    result("q2", measure(q))
Finally, we can emulate our complete implementation using a stabilizer simulator.
To execute our program for a single shot we construct an emulator object and invoke the run method.
emulator = evaluate.emulator(n_qubits=2).stabilizer_sim().with_seed(3)
sim_result = emulator.run()
list(sim_result.results)
[QsysShot(entries=[('q1', 1), ('q2', 0)])]
We can produce larger numbers of shots using the same methods by changing the configuration of the emulator.
Let’s do this and plot the results using matplotlib:
import matplotlib.pyplot as plt
import numpy as np

shots = evaluate.emulator(n_qubits=2).with_seed(0).with_shots(10000).run()

fig, ax = plt.subplots(1, 1)
possible_outcomes = ["00", "01", "10", "11"]
idx = np.asarray(list(range(len(possible_outcomes))))
counts = [len([1 for shot in shots if str(shot.as_dict()['q1']) + str(shot.as_dict()['q2']) == o]) for o in possible_outcomes]

bars = ax.bar(idx, counts)
ax.bar_label(bars, labels=counts)

ax.set_title("Circuit simulation")
ax.set_xlabel("Measurement outcomes")
ax.set_xticks(idx)
ax.set_xticklabels(possible_outcomes)
ax.set_ylabel("Frequency")
plt.show()
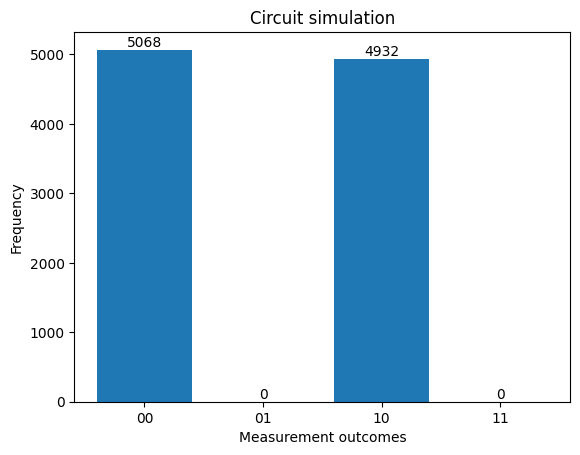
The results roughly match the expected distribution that was predicted in the circuit, up to finite sampling effects.
That’s it, you executed your first Guppy program successfully! To see more examples of Guppy programs, take a look at the Examples Gallery.