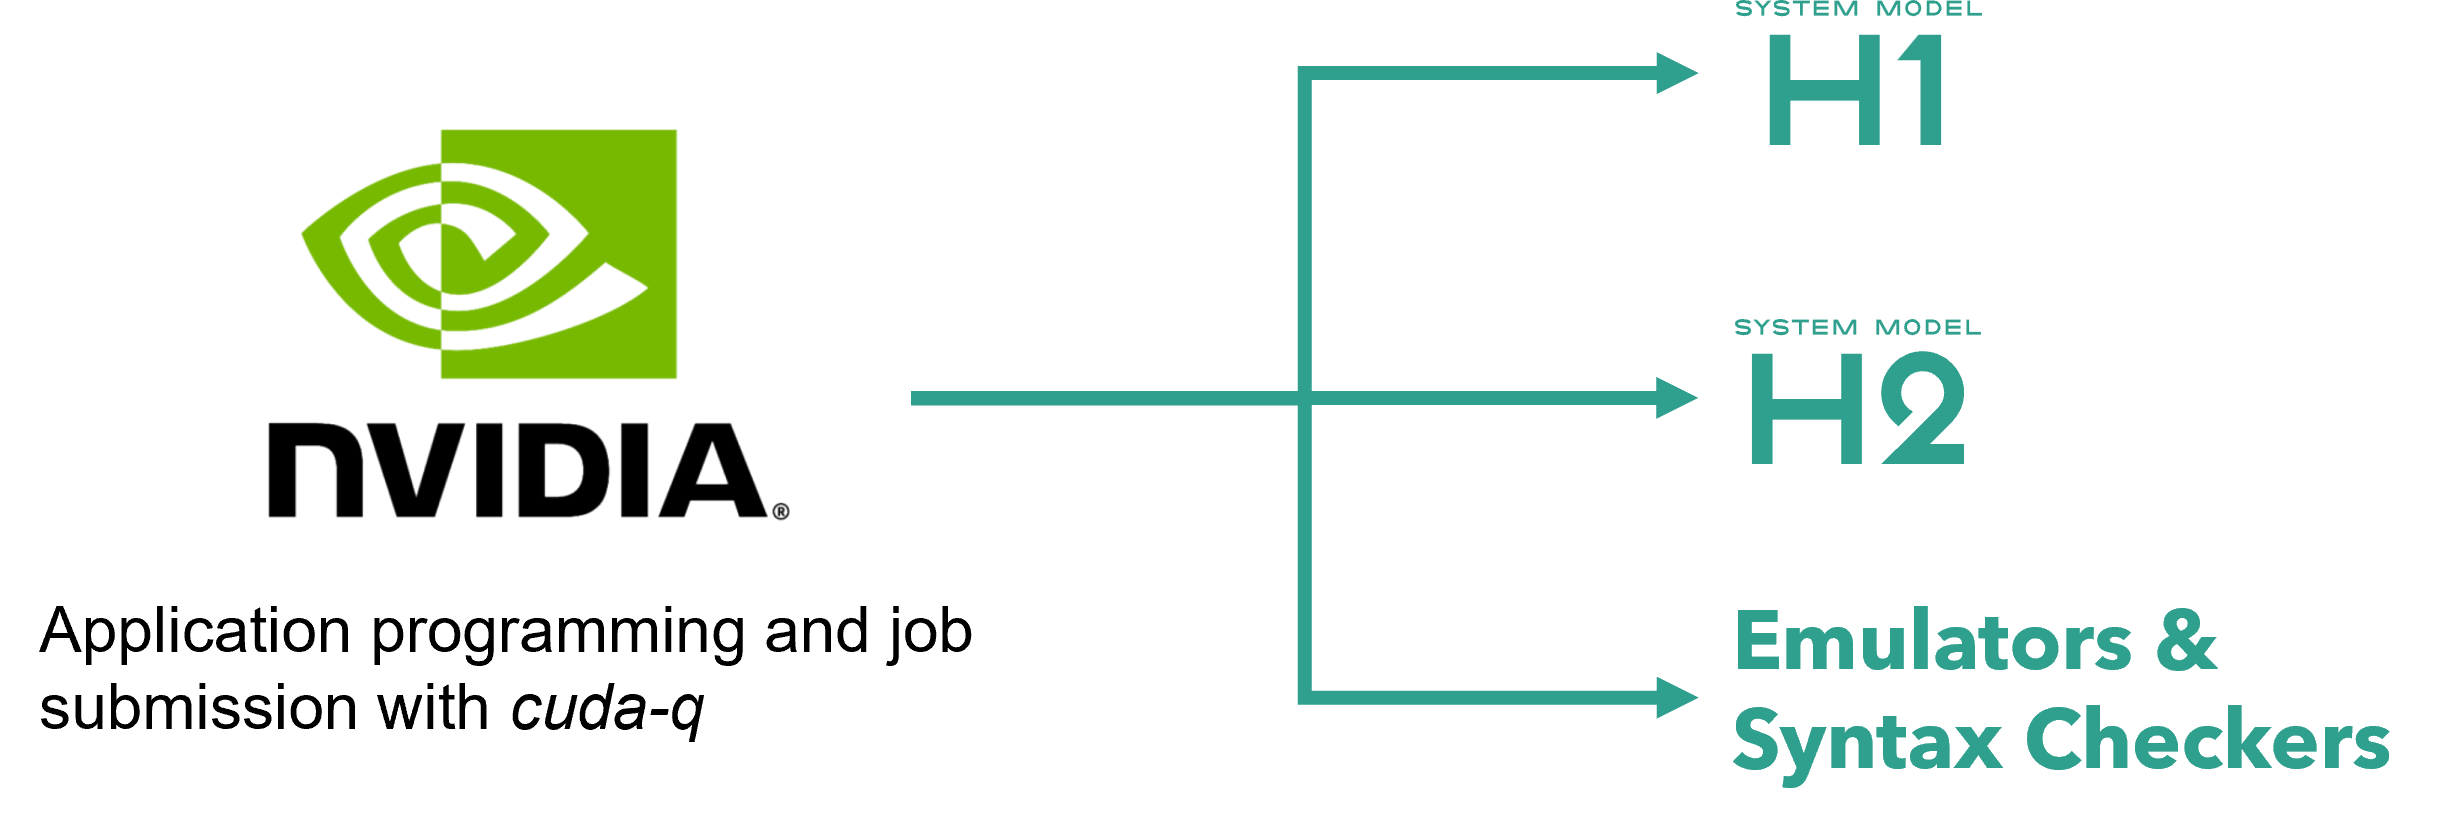
NVIDIA CUDA-Q
CUDA Quantum (CUDA-Q) is a framework developed by NVIDIA designed for quantum computing applications. It is part of NVIDIA’s efforts to integrate quantum computing with classical computing systems, specifically targeting quantum circuit simulation, quantum algorithms, and hybrid quantum-classical workflows. CUDA-Q leverages the power of CUDA (NVIDIA’s parallel computing platform) to accelerate quantum computing simulations and provides a foundation for quantum software development that can run on NVIDIA GPUs. CUDA-Q is available for use as a python package, cudaq.
CUDA-Q provides the ability to program quantum kernels and submit kernels to Quantinuum Systems for execution. All jobs submitted with CUDA-Q to Quantinuum Systems are visible in the Nexus portal. However, end users are required to write custom code and use local storage to manage and save job, respectively.
CUDA-Q kernels are compiled to MLIR and then lowered to Quantum Intermediate Representation (QIR). Communication with Quantinuum endpoints are based on the QIR standard. User specification of compiler and emulator noise model API options are not supported.
Note
This document was generated using the docker container nvidia/quantum/cuda-quantum:cu12-0.9.1.
Installation
Please see NVIDIA’s installation instructions here.
Authentication with Quantinuum Credentials
Note
The curl and jq tools can be installed on the image with apt-get.
sudo apt-get update && apt-get install curl jq
CUDA-Q end users can access the Quantinuum API from either C++ or Python. Quantinuum requires a credential configuration file. The email address and the password must be stored in the environment variables, EMAIL and PASSWORD, respectively. The REST API needs to be queried with the curl and jq commands to generate an access token. The environment variable HOME also needs to be defined.
curl -X POST -H "Content Type: application/json" \
    -d "$(jq -n --arg email "$EMAIL" --arg password "$PASSWORD" \
    '{ "email": $email, "password": $password }')" \
    https://qapi.quantinuum.com/v1/login > $HOME/credentials.json
The jq command can be used to load the access token into local config files stored on disk.
echo "key: $(cat $HOME/credentials.json | jq -r '."id-token"')" >> $HOME/.quantinuum_config
echo "refresh: $(cat $HOME/credentials.json | jq -r '."refresh-token"')" >> $HOME/.quantinuum_config
Application Programming
All quantum programs use the kernel decorator, cudaq.kernel(). The available gateset is specified here: Quantum Operations. All gate operations are rebased to the native Quantinuum gateset before program execution. All programs submitted to Quantinuum Systems must contain measurement operations on all qubits (mz).
Gate angles are specified in radians
import cudaq
import numpy as np

@cudaq.kernel
def primitive():
    coeff: float = -0.111 * np.pi / 2
    qvector = cudaq.qvector(2)
    x.ctrl(qvector[1], qvector[0])
    rz(coeff, qvector[0])
    x.ctrl(qvector[1], qvector[0])
#include <cudaq.h>
#include <cmath>

struct primitive {
    auto operator()() __qpu__ {
        float angle = -0.111 * M_PI / 2;
        cudaq::qarray<2> q;
        x<cudaq::ctrl>(q[0], q[1]);
        rz(angle, q[1]);
        x<cudaq::ctrl>(q[0], q[1]);
        mz(q[0]);
        mz(q[1]);
    }
};
Mid-circuit meaasurement and reset (MCMR) operation via mz and reset operation.
@cudaq.kernel
def mcmr():
    ancilla = cudaq.qubit()
    qvector = cudaq.qvector(2)
    results = []
    for _ in range(3):
        for q in qvector:
            cx(q, ancilla)
            results += mz(ancilla)
            reset(ancilla)
#include <cudaq.h>

struct mcmr{
    auto operator()() __qpu__ {
        cudaq::qubit ancilla;
        cudaq::qarray<2> q;
        for (int i = 0; i < 3; i++) {
            for (int i = 0; i < 2; i++) {
                x<cudaq::ctrl>(ancilla, q[i]);
                mz(ancilla);
                reset(ancilla);
            }
        }
    }
};
Native conditional branching to control operations using MCMR results.
import numpy as np

@cudaq.kernel
def verification(n_qubits: int):
    qvector = cudaq.qvector(n_qubits)
    qvector_reversed = qvector[::-1]
    for qi, qj in zip(qvector_reversed[:-1], qvector[1:]):
        x.ctrl(qi, qj)
    bz = mz(qvector[0])
    reset(qvector[0])
    if bz:
        x(qvector[0])
    for qi, qj in zip(qvector[:-1], qvector[1:]):
        x.ctrl(qi, qj)
template <std::size_t N>
struct verification {
    auto operator()() __qpu__ {
        cudaq::qarray<N> q;
        for (int i = 0; i < N-1; ++i) {
            x<cudaq::ctrl>(q[i], q[i+1]);
        }
        int value = mz(q[N-1]);
        if (value == 1) {
            x(q[N-1]);
        }
        for (int i = N-1; i > 0; --i) {
            x<cudaq::ctrl>(q[i-1], q[i]);
        }
        mz(q);
    }
};
QIR Conversion
CUDA-Q can be used to emit QIR from cudaq.kernel objects.
The method cudaq.translate() can be used to translate the ghz_state kernel into QIR. The kwarg format corresponds to the QIR profile.
import cudaq

@cudaq.kernel
def ghz_state():
    qvector = cudaq.qvector(6)
    h(qvector[0])
    for q in qvector[:1]:
        cx(qvector[-1], q)

qir = cudaq.translate(ghz_state, format="qir")
The ghz_state kernel is defined in the file ghz_state.cpp.
#include <cudaq.h>

struct ghz_state {
  auto operator()() __qpu__ {

    // Compile-time sized array like std::array
    cudaq::qarray<6> q;
    h(q[0]);
    for (int i = 0; i < 5; i++) {
      x<cudaq::ctrl>(q[i], q[i + 1]);
    }
    mz(q);
  }
};
The CUDA-Q kernel can be lowered directly to QIR using the following tools:
cuda-quake: lower C++ to Quakecudaq-opt: Process Quake with various MLIR passescudaq-translate: Lower Quake to an external representation, such as QIR.
The bash command uses these tools to lower the kernel in ghz_state.cpp to QIR (ghz_state.qir).
cudaq-quake ghz_state.cpp | cudaq-opt --canonicalize | cudaq-translate --convert-to=qir -o ghz.qir
Job Submission
The cudaq.set_target() function can be used to specify quantinuum as the target backend and the H2-1SC syntax checker as the target machine.
import cudaq

cudaq.set_target("quantinuum", machine="H2-1SC")
The function cudaq.sample() is used to submit the ghz_state CUDA-Q kernel to the Quantinuum target. This is a blocking function.
syntax_check = cudaq.sample(ghz_state, shots_count=100)
The cudaq.sample_async() function can be called to submit the CX teleportation kernel to the H2-1SC syntax checker, returning a python future, cudaq.AsyncSampleResult. The cudaq.sample_async method is not currently compatible with programs using conditional branching. The method cudaq.sample() should be used instead, however this is a blocking method.
import cudaq

syntax_check = cudaq.sample_async(ghz_state, shots_count=100)
The ghz struct and the main method are defined in ghz.cpp. cudaq::sample is used to execute the ghz kernel with shots.
#include <cudaq.h>

template <std::size_t N>
struct ghz {
  auto operator()() __qpu__ {
    cudaq::qarray<N> q;
    h(q[0]);
    for (int i = 0; i < N - 1; i++) {
      x<cudaq::ctrl>(q[i], q[i + 1]);
    }
    mz(q);
  }
};

int main() {

  auto kernel = ghz<10>{};
  auto counts = cudaq::sample(kernel);

  if (!cudaq::mpi::is_initialized() || cudaq::mpi::rank() == 0) {
    counts.dump();
    for (auto &[bits, count] : counts) {
      printf("Observed: %s, %lu\n", bits.data(), count);
    }
  }

  return 0;
}
The nvq++ compiler can be used to submit the kernel in ghz.cpp. The compiler option --target quantinuum --quantinuum-machine H2-SC is used to specify the Quantinuum syntax checker as the submission target. Executing the output binary ghz.x will submit the kernel and retrieve results. This submission process is non-asynchronous.
nvq++ --target quantinuum --quantinuum-machine H2-1SC ghz.cpp -o ghz.x
./ghz.x
Local Storage
Note
Local storage is only possible when using the Python method cudaq.sample_async.
The python future can be saved locally on disk.
with open("syntax_check.json", "w") as file_io:
    file_io.write(str(syntax_check))
Result retrieval in another python session can be performed with cudaq.AsyncSampleResult. The job data must be loaded from disk into the python session.
with open("syntax_check.json", "r") as file_io:
    job_data = file_io.read()

result = cudaq.AsyncSampleResult(str(job_data))
The format of the serialized AsyncSampleResult is a dictionary with the following keys:
config: A nested dictionary containing the following keysmachine: The Quantinuum target specified in the job submission.output_names.<job_id>: This key has a null value.<job_id>in the key name is the a UUID assigned at job submission.reorderIdx.<job_id>: An empty listshots: An integer specifying the number of shots.
isObserve: A booleanjobs: A nested list. The inner list contains two strings: the job UUID as the first element and the kernel name as the second element. The job UUID corresponds to the Job ID in the Quantinuum Systems job view in the Nexus portal.qpu: a string specifying name of the hardware provider, e.g.quantinuum.
An example of job submission metadata saved to disk is shared below.
{
    "config": {
        "machine": "H2-1SC",
        "output_names.81a0493c67e54de9bc4df3feb243fd2d": "null",
        "reorderIdx.81a0493c67e54de9bc4df3feb243fd2d": "[]",
        "shots": "100"
    },
    "isObserve": false,
    "jobs": [
        [
            "81a0493c67e54de9bc4df3feb243fd2d",
            "ghz_state"
        ]
    ],
    "qpu": "quantinuum"
}
Default Quantinuum API Options
CUDA-Q does not allow end users to modify compiler options via API options. By default, all kernels submitted to a Quantinuum target are optimized with a server-side TKET compilation pass to rewrite the program to use Quantinuum’s native gateset. In addition, all 2-qubit gates are rebased to RZZ, a native parameterized 2-qubit gate operation available on Quantinuum Systems.
CUDA-Q does not allow user customization of the emulator noise model. For a specification of noise model API options, please see the emulator user guide.
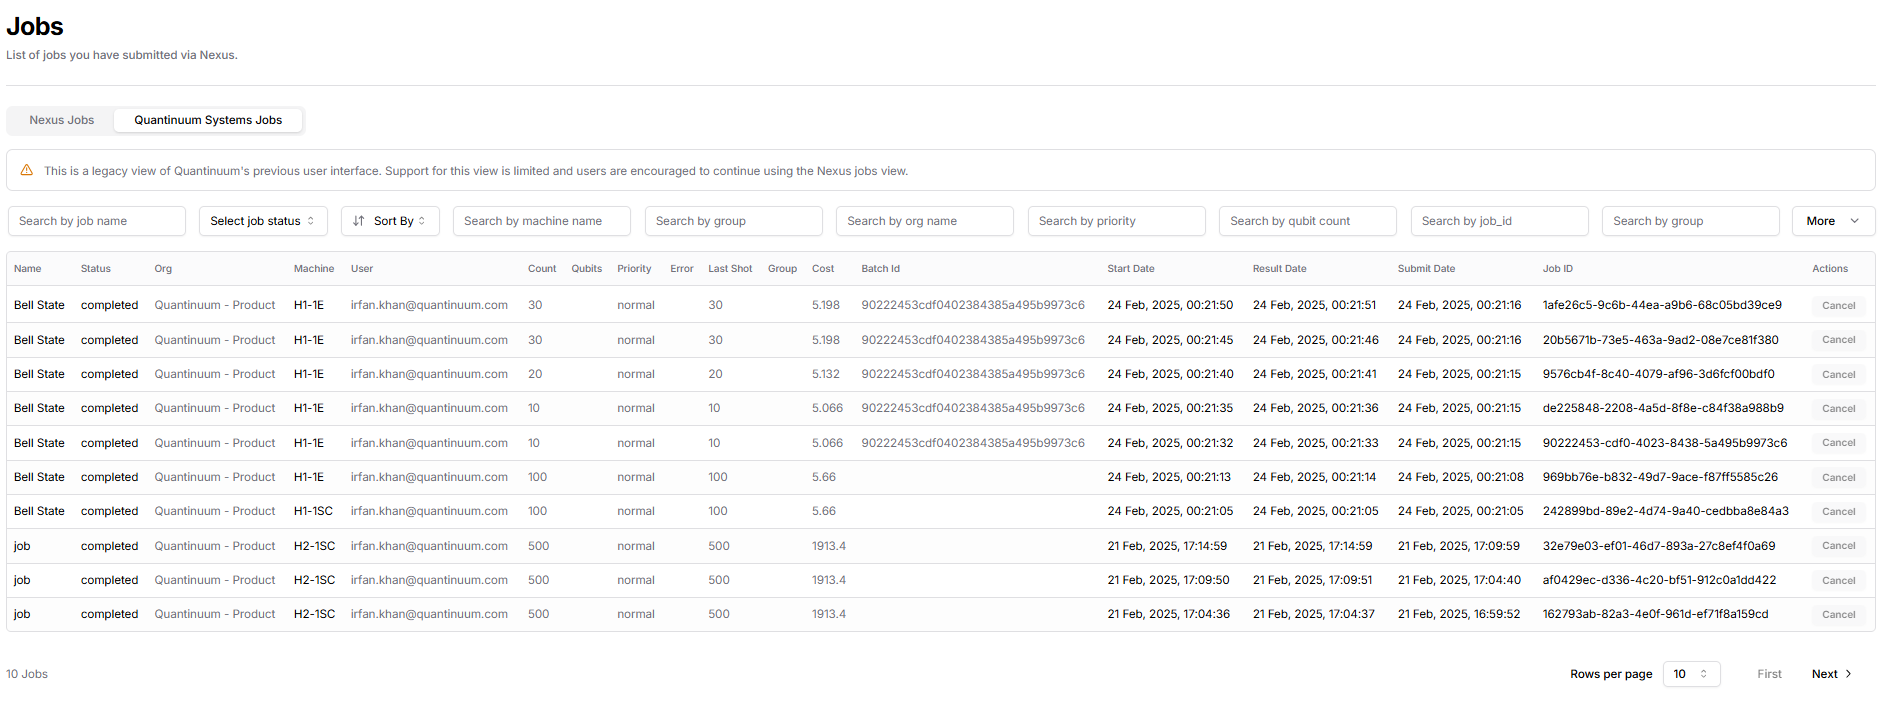
Job Visibility in the Nexus Portal
All jobs submitted with CUDA-Q are assigned a Unique Universal Identifier (UUID). The Nexus Portal provides visibility on the UUID, in addition to job metadata, such as job status and submission date and time. The Nexus portal can be accessed using Quantinuum Systems credentials. Access the Nexus Portal here
The jobs page shows a Quantinuum Systems tab. The tab displays all jobs submitted with CUDA-Q to Quantinuum targets. These jobs are not retrievable with CUDA-Q. The job ID, quantum program and job result should be saved locally by the user. Guidance on local storage of job data is provided here.
API Reference
Relevant links to the CUDA-Q documentation are specified below.
User Guide: Code documentation
Default Operations: Quantum Operations
C++ API: CUDA-Q C++ API
Python API: CUDA-Q Python API
Language Specification: Language Specification
FAQs
Q: What are the unique capabilities that cannot be accessed with CUDA-Q?
A: CUDA-Q provides support to use conditional operations, MCMR and noisy Quantinuum emulators. Only TKET and Nexus enables usage of advanced capabilities, such as job batching, the QEC Decoder Toolkit, \(RZZ\) and \(SU(4)\) parameterized 2-qubit gates and a user-customized noise model for emulation.
Q: What jobs visibility is provided post CUDA-Q submission?
A: The Quantinuum Systems tab on the Jobs page of the Nexus Portal provides visibility on CUDA-Q submissions. See here for more information.
Q: Do both python and C++ API provide access to Quantinuum Systems?
A: Yes, both the python and C++ APIs provide access to Quantinuum Systems.
Q: Is server-side compilation performed on CUDA-Q programs submitted to Quantinuum Systems?
A: Yes, TKET compilation rewrites the program to use the native Quantinuum gateset and performs further optimizations to minimize redundancy or merge gates. Additionally, the native parameterized angle \(RZZ\) is the native 2-qubit gate executed on the system.
Support
For any issues accessing Quantinuum Systems, please contact QCSupport@quantinuum.com. The troubleshooting and FAQs documents also provide support on common issues experienced by customers.